Brush Calligraphy Beginner Tutorial
There are different ways and techniques to write calligraphy and one of them is brush calligraphy. If you’re completely new to the world of lettering, starting with a calligraphy for beginners: complete starter guide will give you a solid overview of everything before diving into this specific style.
When I first came across the word, I thought it’ll look complicated and maybe even a little intimidating because I was using pencil all the while. But it wasn’t and it’s even the easiest amongst other forms of calligraphy.
Brush calligraphy is basically a style of writing where you use a brush pen (kind of like a paint brush but in the form of a pen) to create letters with thick and thin strokes. All you do is grab a brush pen, when you press down on your paper, your lines get thicker, and when you ease up, they get thinner. And that’s how to create that beautiful, flowing look you’ve probably seen on Instagram, greeting cards, or quotes.

Don’t get confused, there’s a difference between brush calligraphy and other styles like traditional calligraphy or hand lettering. The main difference is in the tool and technique. To understand these differences more clearly, this breakdown of modern calligraphy vs traditional calligraphy explains both styles side by side in a beginner-friendly way. And the main difference is in the tool and technique. Traditional calligraphy often uses dip pens and ink, while brush calligraphy uses flexible brush pens with no external ink. Hand lettering, on the other hand, is more like drawing letters instead of writing them.
If you’ve been curious about trying it, you’re definitely in the right place. And in this guide, I’ll walk you through everything you need to get started.
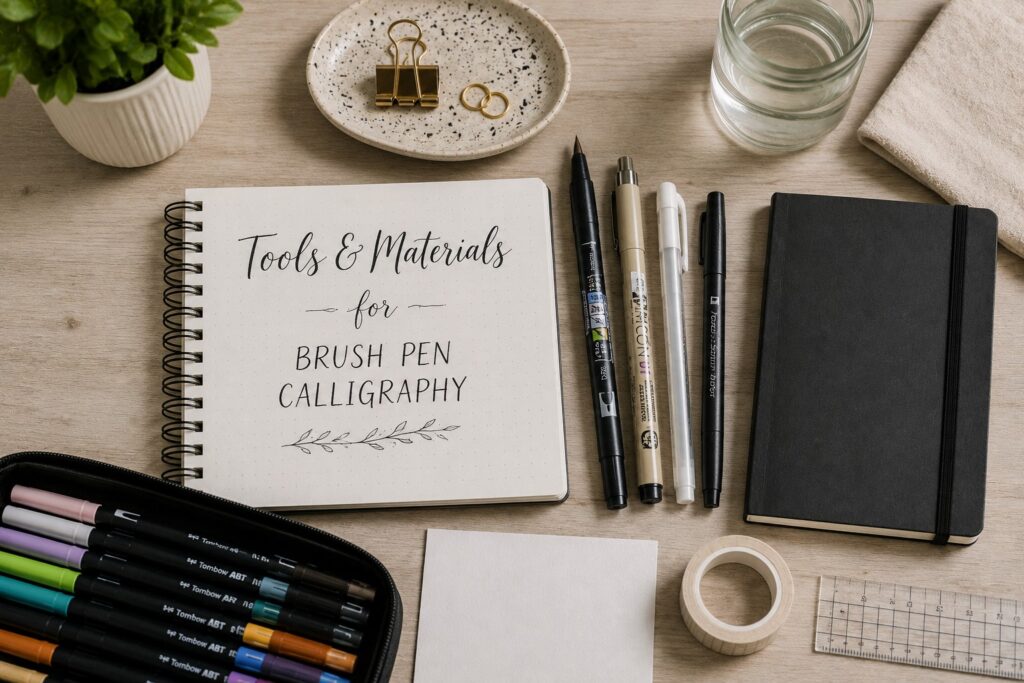
Tools & Materials
Now let’s get into the tools and materials you’ll need to get started
1. Pens
In brush calligraphy, the pen used is called brush pen and there are a lot of it in the market and sometimes, it gets confusing about which is best for you and which to buy, so I am here to help you out. To go even deeper into how to get the best results from your brush pen, check out this guide on how to use brush pens properly; it covers everything from grip to maintenance. There are just two types of brush pens;
Small tip brush pens
Over the years, my favorite brush pen is the Tombow Fudenosuke brand, and they come in three; tombow fudenosuke hard tip, the soft tip and the twin tip. Choosing any depends on the project you are dealing with.
The good thing about tombow pens is that they have small, flexible and long-lasting tips. And as a beginner, using a brush pen with a smaller tip makes it easier to control and to produce thin lines. Regardless of the amount of pressure you put, the tip won’t break. It’s children friendly in the sense that if it stains on clothes, you can easily wash it off. I am allergic to strong odours and this is the main reason I love tombow brush pens, they are odourless and non-toxic. And finally, they are very affordable, you can get them for as low as $8 on Amazon but price can change though due to inflation but it won’t be that high.
Another great brush pen you can get is the Pentel touch sign pen. Whenever I want bright and vibrant colors, I usually grab them. They come in 12 different colors, giving you room to create in varieties.
Lastly, the Zebra Funwari brush pen, they are a little flexible, with a smooth ink flow for easy lettering. Most beginners often see it as a second choice because it is a bit softer than Tombow Fudenosuke.
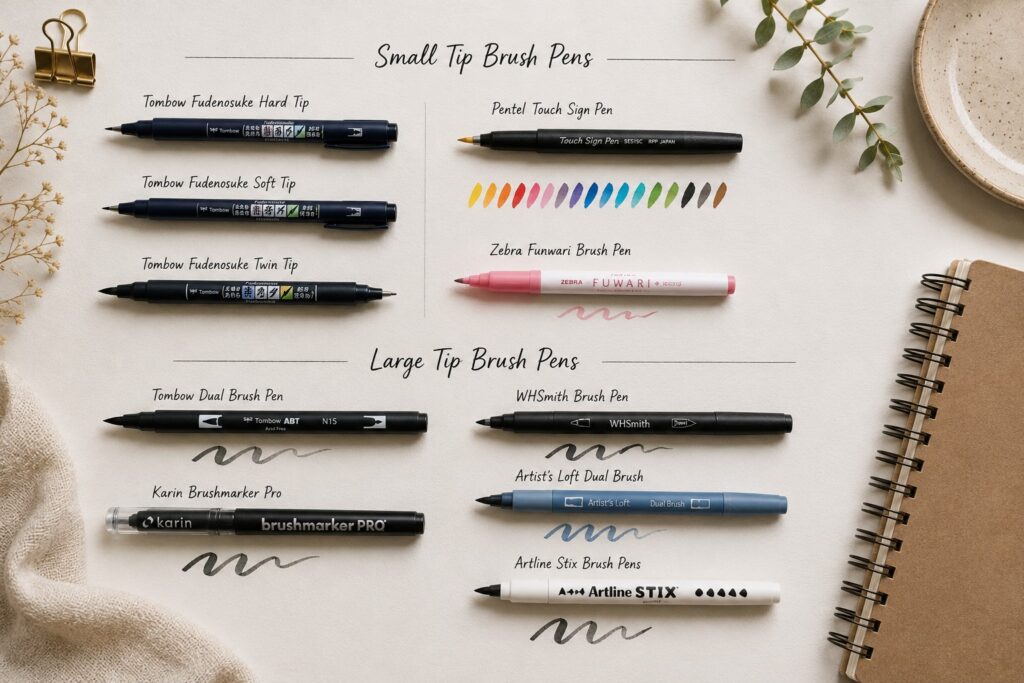
Large tip brush pens
They are used to make bold and bigger styles of letter forms and to be able to use large tip brush pens, you need to be able to control them, so you must practice well. There are only two that I mostly recommend for beginners; Tombow Dual brush pen (come in different colors) and Karin Brushmarker Pro (they are even easier to control than Tombow Dual pen only that it’s a little expensive).
Others include; WHSmith brush pens (mostly UK brand, you may not easily see it), Artist’s Loft Dual Brush and Artline Stix Brush Pens.
2. The Best Paper for Brush Calligraphy
I’m going to tell you something I wish I knew when I first started, your paper matters just as much as your brush pen. You can have the best brush pens in the world, but if you’re using the wrong paper, your strokes will look messy, your ink will bleed, and worst of all, your pen tips will get damaged way too quickly. And if you ever wondered why your letterings don’t look as smooth as the ones you see from your favourite calligraphers, there’s a good chance that your paper is the problem.
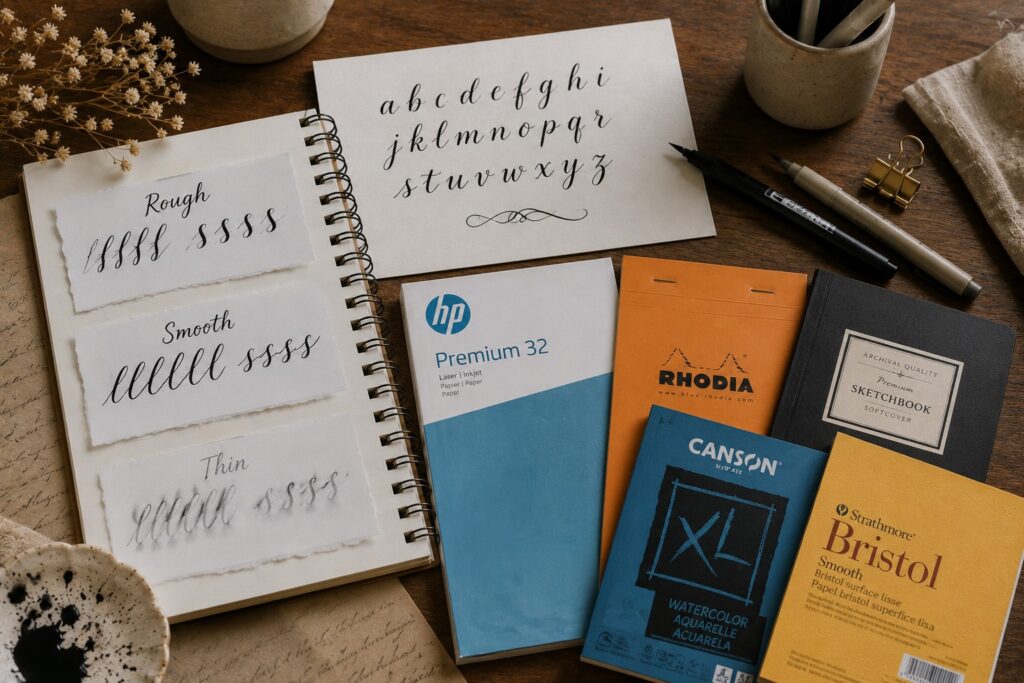
Rough Papers
Are just like driving on a road with potholes, it makes your lines come out shaky instead of smooth. One day, I used my new Nikko G nib on a piece of exercise book paper, and it got my nib broken. It was painful that I nearly cried that day, I just don’t want to remember that day.
Smooth Papers
Will make your calligraphy finishing look crisp and clean. Your brush will just glide easily without friction. I used to think it was normal (or because I was just a newbie to calligraphy) whenever I found it difficult to control pressure, but when I started using smooth papers, I discovered that my strokes were under control.
Thin papers
Have you ever written something and noticed the ink spreading or soaking through the paper? That is called bleeding and it can ruin your work mercilessly. Thin papers absorb too much ink and give your lettering some kind of awkward fuzzy edges. I usually write thick papers whenever I am working on important projects.
Here are papers that are specifically made for calligraphy; HP Premium 32 paper, Rhodia Paper Pads, Hardbound Notebooks, Canson XL Watercolor paper and Strathmore Bristol Smooth paper (great option for blending).
Basic Techniques
Basic Brush Calligraphy Strokes Every Beginner Must Learn
A lot of beginners are fond of jumping right into letters. Some even go straight to words with upper case letters that require flourishes but end up feeling frustrated. You may be in a rush feeling like you just want to write pretty words and upload on social media. But calm down, take a glass of water and listen, just kidding though. Here’s the truth, each beautiful letter you see in calligraphy is built from just a combination of a few basic strokes. For a complete breakdown of all the foundational strokes you need. This post on calligraphy basics: strokes every beginner must learn is a must-read before you move further.
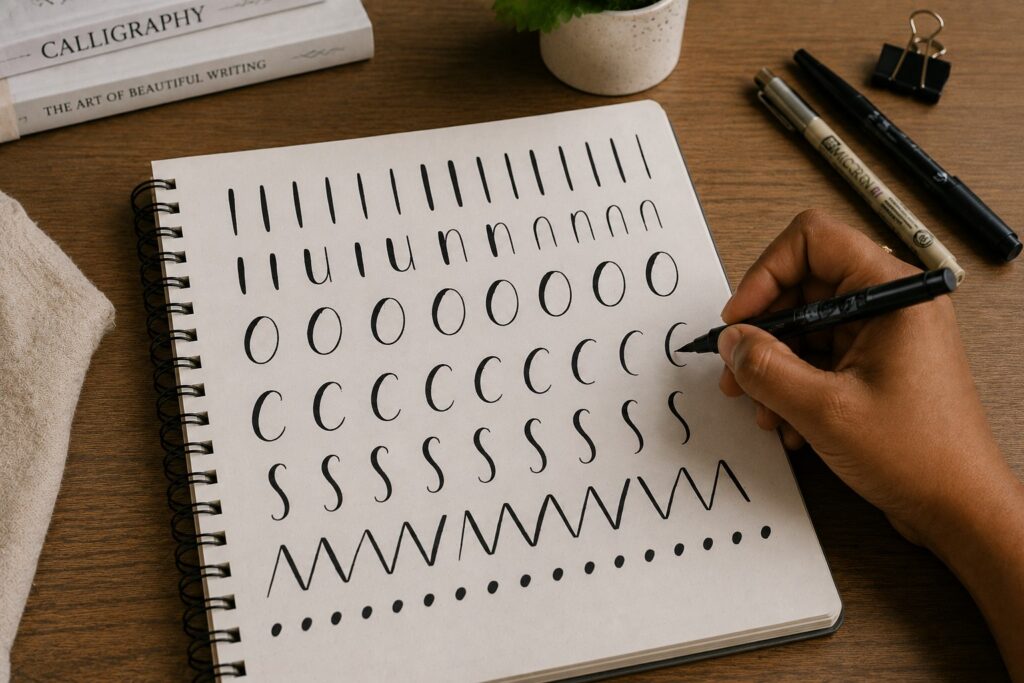
Once you understand how to write these strokes, everything becomes easier. Here are the 3 basic strokes you need to learn as a brush pen calligrapher;

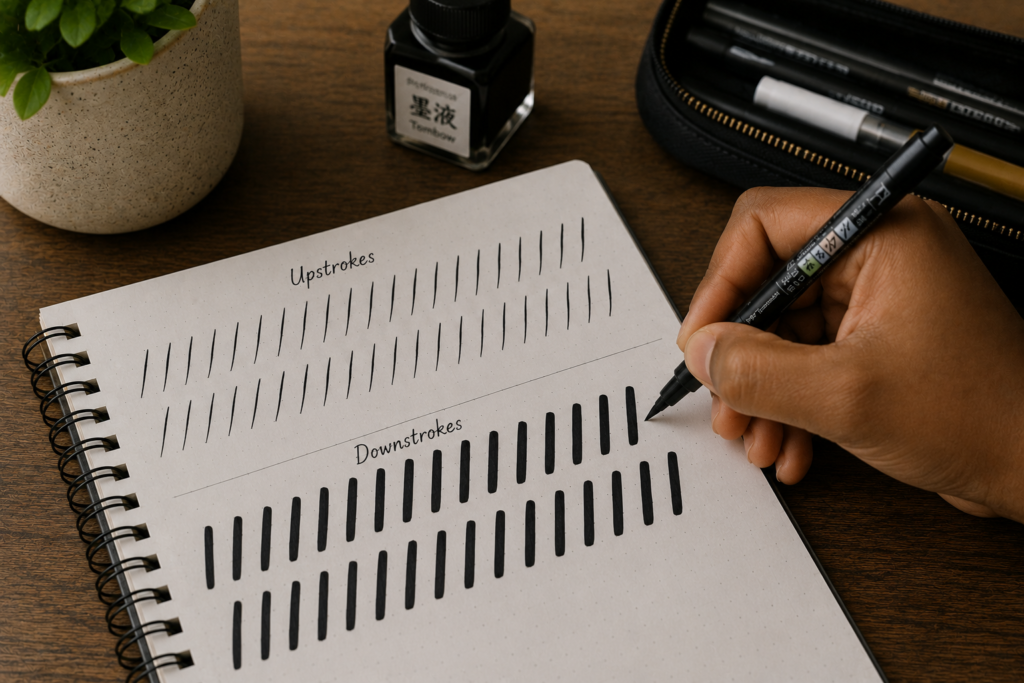
Upstrokes
They are the thin lines you create when your pen moves upwards. It was quite hard for me to learn it because I usually hold my pen with a dead grip but with time, I mastered it. All you need to do is hold your brush pen and move it upwards lightly and slowly. The pen should just glide through the paper and you are done. If the strokes still appear too thick, release some pressure and try again.
Downstrokes
They are thick lines and are easy to create. Press your pen firmly, starting from the top and gently moving downwards while ensuring that the stroke is steady and straight, and then release a little pressure at the ending. A full breakdown of how upstrokes and downstrokes work together is covered in this post on calligraphy basics: understanding upstrokes and downstrokes.
Curves
This is where you combine both the upstrokes and downstroke together to form letters like u, n and o. It teaches you transitioning from upstroke to downstroke and vice versa.
How I write mine is that I start slow, focusing on changing pressure as I move; light pressure as I move upwards and heavy pressure going down.
How to Hold a Brush Pen Correctly
Grip techniques
To prevent your brush from fraying up easily, you need to know how to hold it properly. Unlike the everyday writing that you can hold your ball pen at any angle or straight at 90 degrees, with calligraphy, it’s not so, the most recommended angle to hold your pen is 45 degrees to your paper. If the pen is held too upright, there’ll be not much contrast between your upstrokes and downstrokes, it’ll be as though you’re doing normal writing. For a detailed step-by-step breakdown of the correct grip, check out this guide on how to hold a calligraphy pen correctly.
Naturally, I usually hold my pen roughly 1 to 1.5 inches away from the tip, and the pen does rest against the side of my index, so positioning isn’t kind of hard for me.
Always maintain a relaxed but firm grip and make sure the direction of the pen is perpendicular to the paper in order to achieve a beautiful slant stroke.
For paper position, tilt the paper so it matches the comfort of your 45-degree hand angle, especially if you are left-handed.
How to Practice Pressure Control Without Frustration
If you’ve ever wondered “Why don’t my letters look smooth like everyone else’s?” . It may probably be because of your pressure control, you’re either pressing too much or too lightly.
My tutor, Mr. Henry once said that, “You don’t master pressure control by forcing it. You learn it by practicing it the right way” , and that’s exactly what you need right now. Let me show you how to do that without getting frustrated. Pairing these exercises with beginner calligraphy exercises to improve control will speed up how quickly your hand learns to manage pressure naturally.
Simple Exercises you can actually try out
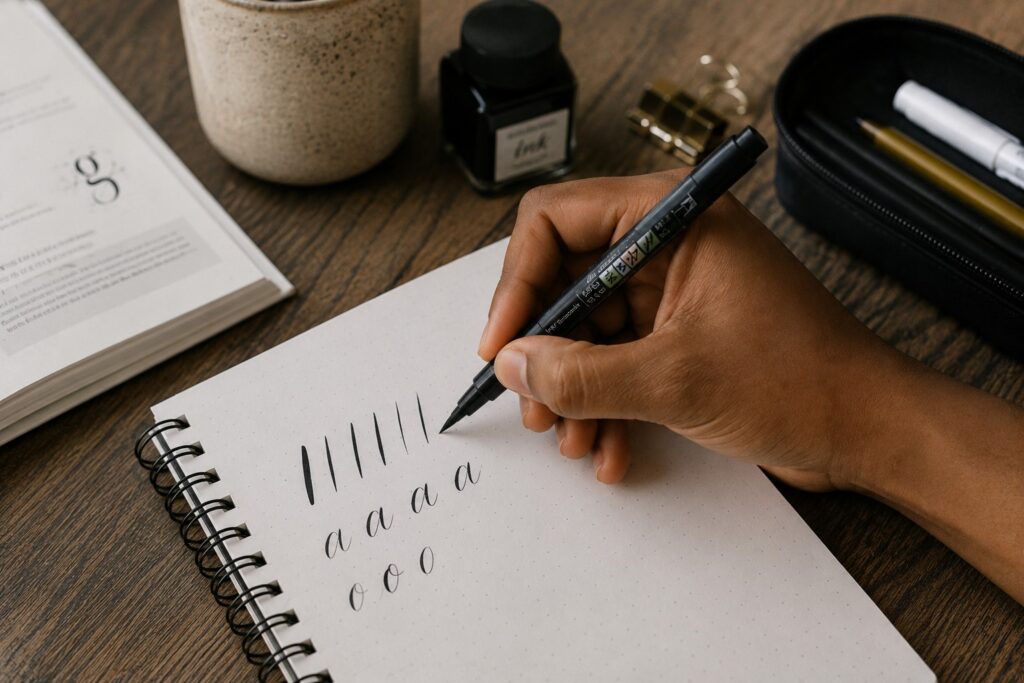
1. Practice Basic Up and Down Strokes
Sometime ago, I punished my daughter by telling her to fill up an entire page with just up strokes and the next page with downstrokes. Little did i know, it was a good punishment because she was always picking up my tools to write each time I am out. And she would leave the whole place messed up and wasting my pen and paper. I thought giving her that punishment would make her stop but it turned out to be a good one. The girl wrote smooth strokes at the end and it kept me in awe.
I also told someone who wanted to learn to try it out too and it worked but he said it was boring at first but the progress was worth it. Incorporating calligraphy drills every beginner should practice into your daily routine will make this kind of repetitive stroke training much more structured and effective.
2. Try Transition Drills
This will help train your hand to switch between pressures smoothly. Start with thin upstroke and then see how you transition to thick stroke and back again to thin strokes.
3. Practice Basic Shapes
Start with basic shapes that forces you to combine upstrokes and downstrokes like u, n and o. Once your shapes feel comfortable, moving on to how to create your first calligraphy alphabet is the natural next step; it walks you through every letter group stroke by stroke in a clear, beginner-friendly way.
If you’re learning from home and need a full roadmap to guide your journey, how to learn calligraphy at home covers everything from setting up your workspace to building a self-teaching routine that actually works. And if you ever find yourself curious about trying a tool-free approach alongside your brush pen practice. A faux calligraphy tutorial for absolute beginners is a fun and easy way to improve using just a regular pen. For anyone wondering how quickly all of this comes together, how long it takes to learn calligraphy gives you a realistic and encouraging perspective on the journey ahead.
Final Thoughts
With brush calligraphy, you’re actually writing in a continuous motion, no stress of having to sketch each letter or dip.
One big reason that I think makes it so popular right now is because it’s accessible and less expensive. You don’t need a lot to start; just a brush pen and paper and you can practice anywhere. Just like every other style, it is relaxing, creative, and a really nice way to slow down after a hot day. I see it as the therapist you never knew you needed.
If I could go back and talk to my beginner self, here’s exactly what I would say:
- You don’t need to press too hard for thick strokes. I used to press aggressively, thinking it would make better lines. It didn’t; it just damaged my pen tips. Knowing how to avoid common beginner calligraphy mistakes early on would have saved me a lot of damaged tools and frustration.
- Consistency matters more than perfection: Just keep practicing regularly, your strokes won’t look perfect every time. A structured 30-day calligraphy practice plan is one of the best ways to stay consistent without feeling overwhelmed. And whenever you feel stuck, tips on how to improve calligraphy fast will help you push through plateaus quickly.
- Your tools and paper affect your pressure control. When I switched to smoother paper, everything felt easier instantly and I enjoyed calligraphy the most. Working on how to create consistent calligraphy letters alongside your brush pen practice will help you turn that improved control into polished, uniform lettering.
- It’s okay if it feels awkward at first. Your hand is learning something new, it will be shaky at first, just give it time.